Multi PHP Version
Mengelola beberapa versi PHP dalam satu server adalah kebutuhan penting, terutama untuk lingkungan shared hosting atau developer yang menangani berbagai aplikasi berbasis PHP. Pada Apache Web Server di AlmaLinux 8, kita bisa menjalankan multiple PHP version secara bersamaan menggunakan pendekatan yang tepat. Panduan ini akan memandu secara lengkap, rinci, dan praktis bagaimana cara mengatur lingkungan Apache untuk menjalankan beberapa versi PHP di sistem AlmaLinux 8, mulai dari instalasi hingga konfigurasi virtual host.
Prerequisite
- Akses full
root - Apache/HTTPD sudah terinstall
- Basic Linux Command Line
- Domain (opsional)
Persiapan
Sebelum memulai instalasi dan konfigurasi, pastikan sistem kita telah dalam kondisi terbaru dan stabil. Lakukan update sistem menggunakan perintah berikut:
dnf update -y
Kita juga membutuhkan repository tambahan dari Remi dan Epel karena versi PHP yang tersedia secara default sangat terbatas. Tambahkan Remi Repository dengan perintah berikut:
dnf install -y https://rpms.remirepo.net/enterprise/remi-release-8.rpm
dnf install epel-release -y
Reset modul PHP agar kita tidak terikat pada satu versi saja:
dnf module reset php -y
Kemudian list PHP yang tersedia menggunakan perintah berikut:
dnf module list php
Contoh ouput:
AlmaLinux 8 - AppStream
Name                                 Stream                                   Profiles                                                   Summary
php                                  7.2 [d]                                  common [d], devel, minimal                                 PHP scripting language
php                                  7.3                                      common [d], devel, minimal                                 PHP scripting language
php                                  7.4                                      common [d], devel, minimal                                 PHP scripting language
php                                  8.0                                      common [d], devel, minimal                                 PHP scripting language
php                                  8.2                                      common [d], devel, minimal                                 PHP scripting language

Remi's Modular repository for Enterprise Linux 8 - x86_64
Name                                 Stream                                   Profiles                                                   Summary
php                                  remi-7.2                                 common [d], devel, minimal                                 PHP scripting language
php                                  remi-7.3                                 common [d], devel, minimal                                 PHP scripting language
php                                  remi-7.4                                 common [d], devel, minimal                                 PHP scripting language
php                                  remi-8.0                                 common [d], devel, minimal                                 PHP scripting language
php                                  remi-8.1                                 common [d], devel, minimal                                 PHP scripting language
php                                  remi-8.2                                 common [d], devel, minimal                                 PHP scripting language
php                                  remi-8.3                                 common [d], devel, minimal                                 PHP scripting language
php                                  remi-8.4                                 common [d], devel, minimal                                 PHP scripting language
Lalu pastikan Apache sudah terinstall, apabila belum terinstall jalankan perintah berikut:
dnf install httpd -y
systemctl enable --now httpd
Pastikan port 80/443 sudah terbuka, jika menggunakan firewalld jalankan perintah berikut:
firewall-cmd --permanent --add-service={http,https}
firewall-cmd --reload
Cek module Proxy yang dibutuhkan oleh PHP karena nanti akan menggunakan koneksi via socket:
httpd -M | grep proxy
Contoh output:
proxy_fcgi_module (shared)
proxy_module (shared)
Install Multi PHP
Langkah selanjutnya adalah menginstal berbagai versi PHP. Misalnya, kita ingin menggunakan PHP 7.4, 8.0, dan 8.1. Kita akan menggunakan repository Remi untuk memasang semuanya secara berurutan.
Pastikan untuk menginstall versi PHP sesuai dengan kebutuhan atau aplikasi.
PHP 7.2
Jalankan perintah berikut untuk install PHP 7.2:
dnf module reset php
dnf module enable php:remi-7.2
dnf install php72 php72-php php72-php-cli php72-php-fpm php72-php-mysqlnd php72-php-gd php72-php-mbstring php72-php-xml php72-php-opcache
Verifikasi instalasi PHP 7.2:
php72 -v
Contoh output:
PHP 7.2.34 (cli) (built: Nov 26 2024 07:18:04) ( NTS )
Copyright (c) 1997-2018 The PHP Group
Zend Engine v3.2.0, Copyright (c) 1998-2018 Zend Technologies
    with Zend OPcache v7.2.34, Copyright (c) 1999-2018, by Zend Technologies
Virtualhost untuk PHP 7.2:
nano /etc/httpd/conf.d/php72.focusnic.biz.id.conf
Isi parameter berikut:
<VirtualHost *:80>
    ServerAdmin webmaster@focusnic.biz.id
    ServerName php72.focusnic.biz.id
    DocumentRoot /var/www/php72.focusnic.biz.id/public_html

    <FilesMatch \.php$>
        SetHandler "proxy:unix:/var/opt/remi/php72/run/php-fpm/www.sock|fcgi://localhost"
    </FilesMatch>

    ErrorLog /var/log/httpd/php72.focusnic.biz.id-error.log
    CustomLog /var/log/httpd/php72.focusnic.biz.id-access.log combined
</VirtualHost>
Buat direktori untuk virtualhost diatas:
mkdir -p /var/www/php72.focusnic.biz.id/public_html
Kemudian buat file info.php untuk menguji instalasi PHP 7.2:
echo "<?php phpinfo(); ?>" | tee /var/www/php72.focusnic.biz.id/public_html/info.php
Lalu enable service php72-php-fpm dan restart Apache setelah melakukan perubahan:
systemctl enable --now php72-php-fpm
systemctl restart httpd
Kemudian akses melalui browser http://php72.focusnic.biz.id/info.php

PHP 7.3
Jalankan perintah berikut untuk install PHP 7.3:
dnf module reset php
dnf module enable php:remi-7.3
dnf install php73 php73-php php73-php-cli php73-php-fpm php73-php-mysqlnd php73-php-gd php73-php-mbstring php73-php-xml php73-php-opcache
Verifikasi instalasi PHP 7.3:
php73 -v
Contoh output:
PHP 7.3.33 (cli) (built: Nov 28 2024 11:42:24) ( NTS )
Copyright (c) 1997-2018 The PHP Group
Zend Engine v3.3.33, Copyright (c) 1998-2018 Zend Technologies
    with Zend OPcache v7.3.33, Copyright (c) 1999-2018, by Zend Technologies
Virtualhost untuk PHP 7.3:
nano /etc/httpd/conf.d/php73.focusnic.biz.id.conf
Isi parameter berikut:
<VirtualHost *:80>
    ServerAdmin webmaster@focusnic.biz.id
    ServerName php73.focusnic.biz.id
    DocumentRoot /var/www/php73.focusnic.biz.id/public_html

    <FilesMatch \.php$>
        SetHandler "proxy:unix:/var/opt/remi/php73/run/php-fpm/www.sock|fcgi://localhost"
    </FilesMatch>

    ErrorLog /var/log/httpd/php73.focusnic.biz.id-error.log
    CustomLog /var/log/httpd/php73.focusnic.biz.id-access.log combined
</VirtualHost>
Buat direktori untuk virtualhost diatas:
mkdir -p /var/www/php73.focusnic.biz.id/public_html
Kemudian buat file info.php untuk menguji instalasi PHP 7.3:
echo "<?php phpinfo(); ?>" | tee /var/www/php73.focusnic.biz.id/public_html/info.php
Lalu enable service php73-php-fpm dan restart Apache setelah melakukan perubahan:
systemctl enable --now php73-php-fpm
systemctl restart httpd
Kemudian akses melalui browser http://php73.focusnic.biz.id/info.php

PHP 7.4
Jalankan perintah berikut untuk install PHP 7.4:
dnf module reset php
dnf module enable php:remi-7.4
dnf install php74 php74-php php74-php-cli php74-php-fpm php74-php-mysqlnd php74-php-gd php74-php-mbstring php74-php-xml php74-php-opcache
Verifikasi instalasi PHP 7.4:
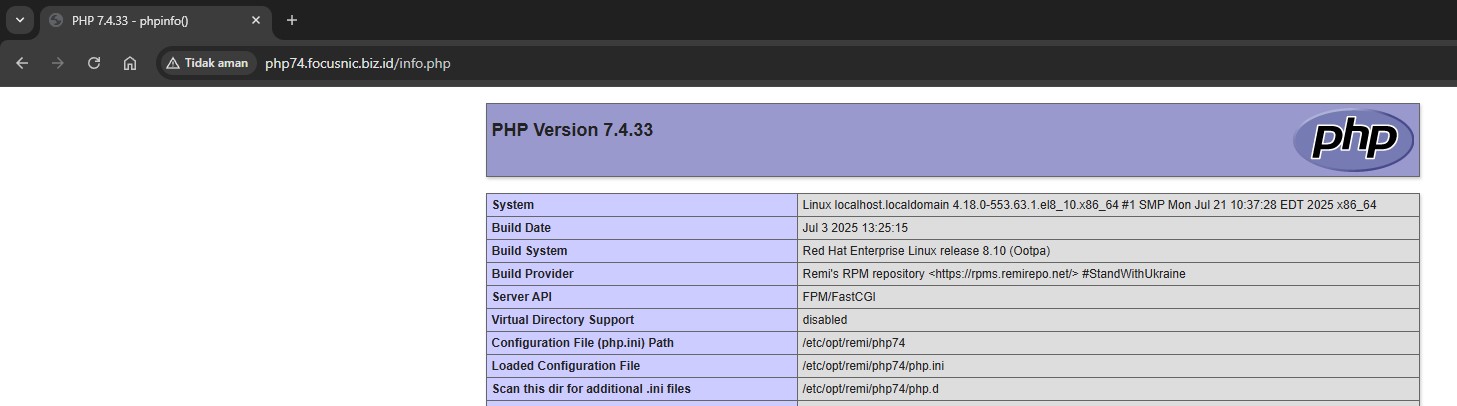
php74 -v
Contoh output:
PHP 7.4.33 (cli) (built: Jul  3 2025 13:25:15) ( NTS )
Copyright (c) The PHP Group
Zend Engine v3.4.0, Copyright (c) Zend Technologies
    with Zend OPcache v7.4.33, Copyright (c), by Zend Technologies
Virtualhost untuk PHP 7.4:
nano /etc/httpd/conf.d/php74.focusnic.biz.id.conf
Isi parameter berikut:
<VirtualHost *:80>
    ServerAdmin webmaster@focusnic.biz.id
    ServerName php74.focusnic.biz.id
    DocumentRoot /var/www/php74.focusnic.biz.id/public_html

    <FilesMatch \.php$>
        SetHandler "proxy:unix:/var/opt/remi/php74/run/php-fpm/www.sock|fcgi://localhost"
    </FilesMatch>

    ErrorLog /var/log/httpd/php74.focusnic.biz.id-error.log
    CustomLog /var/log/httpd/php74.focusnic.biz.id-access.log combined
</VirtualHost>
Buat direktori untuk virtualhost diatas:
mkdir -p /var/www/php74.focusnic.biz.id/public_html
Kemudian buat file info.php untuk menguji instalasi PHP 7.4:
echo "<?php phpinfo(); ?>" | tee /var/www/php74.focusnic.biz.id/public_html/info.php
Lalu enable service php74-php-fpm dan restart Apache setelah melakukan perubahan:
systemctl enable --now php74-php-fpm
systemctl restart httpd
Kemudian akses melalui browser http://php74.focusnic.biz.id/info.php
PHP 8.0
Jalankan perintah berikut untuk install PHP 8.0:
dnf module reset php
dnf module enable php:remi-8.0
dnf install php80 php80-php php80-php-cli php80-php-fpm php80-php-mysqlnd php80-php-gd php80-php-mbstring php80-php-xml php80-php-opcache
Verifikasi instalasi PHP 8.0:
php80 -v
Contoh output:
PHP 8.0.30 (cli) (built: Jul  3 2025 08:01:28) ( NTS gcc x86_64 )
Copyright (c) The PHP Group
Zend Engine v4.0.30, Copyright (c) Zend Technologies
    with Zend OPcache v8.0.30, Copyright (c), by Zend Technologies
Virtualhost untuk PHP 8.0:
nano /etc/httpd/conf.d/php80.focusnic.biz.id.conf
Isi parameter berikut:
<VirtualHost *:80>
    ServerAdmin webmaster@focusnic.biz.id
    ServerName php80.focusnic.biz.id
    DocumentRoot /var/www/php80.focusnic.biz.id/public_html

    <FilesMatch \.php$>
        SetHandler "proxy:unix:/var/opt/remi/php80/run/php-fpm/www.sock|fcgi://localhost"
    </FilesMatch>

    ErrorLog /var/log/httpd/php80.focusnic.biz.id-error.log
    CustomLog /var/log/httpd/php80.focusnic.biz.id-access.log combined
</VirtualHost>
Buat direktori untuk virtualhost diatas:
mkdir -p /var/www/php80.focusnic.biz.id/public_html
Kemudian buat file info.php untuk menguji instalasi PHP 8.0:
echo "<?php phpinfo(); ?>" | tee /var/www/php80.focusnic.biz.id/public_html/info.php
Lalu enable service php80-php-fpm dan restart Apache setelah melakukan perubahan:
systemctl enable --now php80-php-fpm
systemctl restart httpd
Kemudian akses melalui browser http://php80.focusnic.biz.id/info.php

PHP 8.1
Jalankan perintah berikut untuk install PHP 8.1:
dnf module reset php
dnf module enable php:remi-8.1
dnf install php81 php81-php php81-php-cli php81-php-fpm php81-php-mysqlnd php81-php-gd php81-php-mbstring php81-php-xml php81-php-opcache
Verifikasi instalasi PHP 8.1:
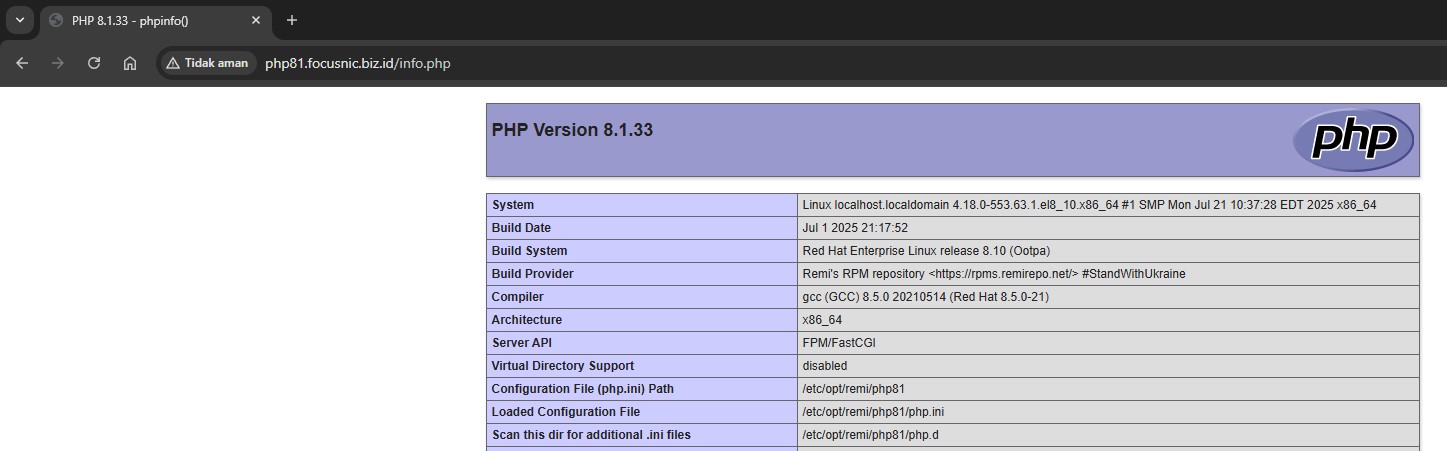
php81 -v
Contoh output:
PHP 8.1.33 (cli) (built: Jul  1 2025 21:17:52) (NTS gcc x86_64)
Copyright (c) The PHP Group
Zend Engine v4.1.33, Copyright (c) Zend Technologies
    with Zend OPcache v8.1.33, Copyright (c), by Zend Technologies
Virtualhost untuk PHP 8.1:
nano /etc/httpd/conf.d/php81.focusnic.biz.id.conf
Isi parameter berikut:
<VirtualHost *:80>
    ServerAdmin webmaster@focusnic.biz.id
    ServerName php81.focusnic.biz.id
    DocumentRoot /var/www/php81.focusnic.biz.id/public_html

    <FilesMatch \.php$>
        SetHandler "proxy:unix:/var/opt/remi/php81/run/php-fpm/www.sock|fcgi://localhost"
    </FilesMatch>

    ErrorLog /var/log/httpd/php81.focusnic.biz.id-error.log
    CustomLog /var/log/httpd/php81.focusnic.biz.id-access.log combined
</VirtualHost>
Buat direktori untuk virtualhost diatas:
mkdir -p /var/www/php81.focusnic.biz.id/public_html
Kemudian buat file info.php untuk menguji instalasi PHP 8.1:
echo "<?php phpinfo(); ?>" | tee /var/www/php81.focusnic.biz.id/public_html/info.php
Lalu enable service php81-php-fpm dan restart Apache setelah melakukan perubahan:
systemctl enable --now php81-php-fpm
systemctl restart httpd
Kemudian akses melalui browser http://php81.focusnic.biz.id/info.php
PHP 8.2
Jalankan perintah berikut untuk install PHP 8.2:
dnf module reset php
dnf module enable php:remi-8.2
dnf install php82 php82-php php82-php-cli php82-php-fpm php82-php-mysqlnd php82-php-gd php82-php-mbstring php82-php-xml php82-php-opcache
Verifikasi instalasi PHP 8.2:
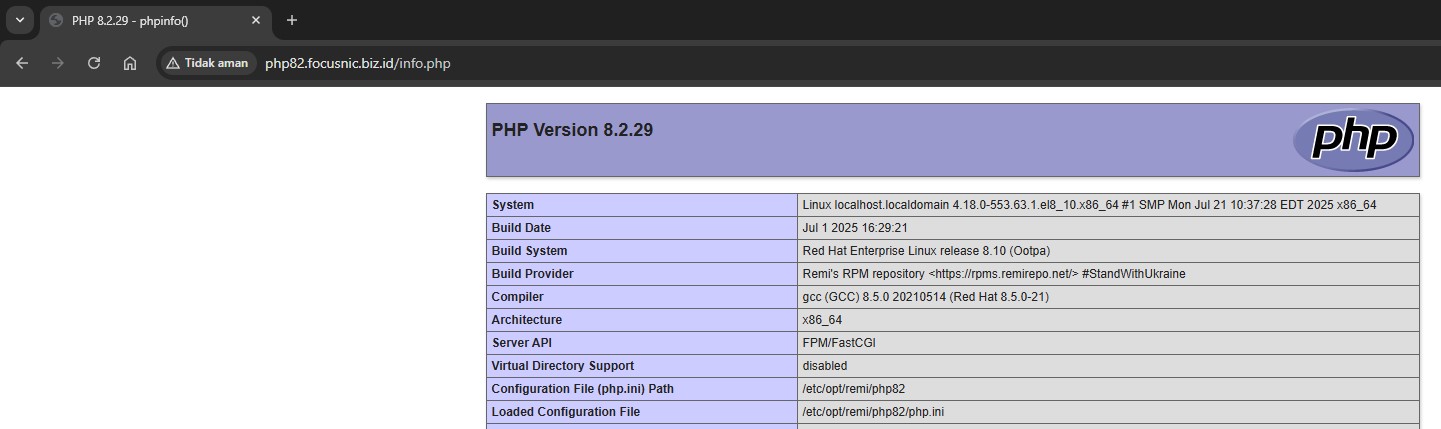
php82 -v
Contoh output:
PHP 8.2.29 (cli) (built: Jul  1 2025 16:29:21) (NTS gcc x86_64)
Copyright (c) The PHP Group
Zend Engine v4.2.29, Copyright (c) Zend Technologies
    with Zend OPcache v8.2.29, Copyright (c), by Zend Technologies
Virtualhost untuk PHP 8.2:
nano /etc/httpd/conf.d/php82.focusnic.biz.id.conf
Isi parameter berikut:
<VirtualHost *:80>
    ServerAdmin webmaster@focusnic.biz.id
    ServerName php82.focusnic.biz.id
    DocumentRoot /var/www/php82.focusnic.biz.id/public_html

    <FilesMatch \.php$>
        SetHandler "proxy:unix:/var/opt/remi/php82/run/php-fpm/www.sock|fcgi://localhost"
    </FilesMatch>

    ErrorLog /var/log/httpd/php82.focusnic.biz.id-error.log
    CustomLog /var/log/httpd/php82.focusnic.biz.id-access.log combined
</VirtualHost>
Buat direktori untuk virtualhost diatas:
mkdir -p /var/www/php82.focusnic.biz.id/public_html
Kemudian buat file info.php untuk menguji instalasi PHP 8.2:
echo "<?php phpinfo(); ?>" | tee /var/www/php82.focusnic.biz.id/public_html/info.php
Lalu enable service php82-php-fpm dan restart Apache setelah melakukan perubahan:
systemctl enable --now php82-php-fpm
systemctl restart httpd
Kemudian akses melalui browser http://php82.focusnic.biz.id/info.php
PHP 8.3
Jalankan perintah berikut untuk install PHP 8.3:
dnf module reset php
dnf module enable php:remi-8.3
dnf install php83 php83-php php83-php-cli php83-php-fpm php83-php-mysqlnd php83-php-gd php83-php-mbstring php83-php-xml php83-php-opcache
Verifikasi instalasi PHP 8.3:
php83 -v
Contoh output:
PHP 8.3.29 (cli) (built: Jul  1 2025 16:29:21) (NTS gcc x86_64)
Copyright (c) The PHP Group
Zend Engine v4.2.29, Copyright (c) Zend Technologies
    with Zend OPcache v8.3.29, Copyright (c), by Zend Technologies
Virtualhost untuk PHP 8.3:
nano /etc/httpd/conf.d/php83.focusnic.biz.id.conf
Isi parameter berikut:
<VirtualHost *:80>
    ServerAdmin webmaster@focusnic.biz.id
    ServerName php83.focusnic.biz.id
    DocumentRoot /var/www/php83.focusnic.biz.id/public_html

    <FilesMatch \.php$>
        SetHandler "proxy:unix:/var/opt/remi/php83/run/php-fpm/www.sock|fcgi://localhost"
    </FilesMatch>

    ErrorLog /var/log/httpd/php83.focusnic.biz.id-error.log
    CustomLog /var/log/httpd/php83.focusnic.biz.id-access.log combined
</VirtualHost>
Buat direktori untuk virtualhost diatas:
mkdir -p /var/www/php83.focusnic.biz.id/public_html
Kemudian buat file info.php untuk menguji instalasi PHP 8.3:
echo "<?php phpinfo(); ?>" | tee /var/www/php83.focusnic.biz.id/public_html/info.php
Lalu enable service php83-php-fpm dan restart Apache setelah melakukan perubahan:
systemctl enable --now php83-php-fpm
systemctl restart httpd
Kemudian akses melalui browser http://php83.focusnic.biz.id/info.php

PHP 8.4
Jalankan perintah berikut untuk install PHP 8.4:
dnf module reset php
dnf module enable php:remi-8.4
dnf install php84 php84-php php84-php-cli php84-php-fpm php84-php-mysqlnd php84-php-gd php84-php-mbstring php84-php-xml php84-php-opcache
Verifikasi instalasi PHP 8.4:
php84 -v
Contoh output:
PHP 8.4.10 (cli) (built: Jul  2 2025 02:22:42) (NTS gcc x86_64)
Copyright (c) The PHP Group
Built by Remi's RPM repository <https://rpms.remirepo.net/> #StandWithUkraine
Zend Engine v4.4.10, Copyright (c) Zend Technologies
    with Zend OPcache v8.4.10, Copyright (c), by Zend Technologies
Virtualhost untuk PHP 8.4:
nano /etc/httpd/conf.d/php84.focusnic.biz.id.conf
Isi parameter berikut:
<VirtualHost *:80>
    ServerAdmin webmaster@focusnic.biz.id
    ServerName php84.focusnic.biz.id
    DocumentRoot /var/www/php84.focusnic.biz.id/public_html

    <FilesMatch \.php$>
        SetHandler "proxy:unix:/var/opt/remi/php84/run/php-fpm/www.sock|fcgi://localhost"
    </FilesMatch>

    ErrorLog /var/log/httpd/php84.focusnic.biz.id-error.log
    CustomLog /var/log/httpd/php84.focusnic.biz.id-access.log combined
</VirtualHost>
Buat direktori untuk virtualhost diatas:
mkdir -p /var/www/php84.focusnic.biz.id/public_html
Kemudian buat file info.php untuk menguji instalasi PHP 8.4:
echo "<?php phpinfo(); ?>" | tee /var/www/php84.focusnic.biz.id/public_html/info.php
Lalu enable service php84-php-fpm dan restart Apache setelah melakukan perubahan:
systemctl enable --now php84-php-fpm
systemctl restart httpd
Kemudian akses melalui browser http://php84.focusnic.biz.id/info.php

Troubleshooting
- Error: 503 Service Unavailable
Cek apakah socket FPM sesuai dan aktif. Periksa log:
tail -f /var/log/httpd/error_log
- Error: Cannot connect to PHP-FPM
Pastikan path untuk socket sudah benar, ganti phpXX sesuai dengan PHP yang ingin digunakan:
    <FilesMatch \.php$>
        SetHandler "proxy:unix:/var/opt/remi/phpXX/run/php-fpm/www.sock|fcgi://localhost"
    </FilesMatch>
Kesimpulan
Dengan mengikuti panduan di atas, kita bisa menjalankan beberapa versi PHP secara bersamaan di Apache Web Server AlmaLinux 8 tanpa konflik. Teknik ini sangat berguna untuk kebutuhan pengembangan, migrasi aplikasi, maupun hosting klien dengan kebutuhan PHP yang berbeda.
Q: Apakah bisa menggunakan lebih dari 3 versi PHP sekaligus?
A: Bisa, selama port atau socket FPM tidak bentrok, kita bisa menambahkan PHP 7.3, 8.2, dst.
Q: Apakah setiap versi PHP akan mengkonsumsi RAM secara terpisah?
A: Ya, setiap proses php-fpm akan menggunakan resource sendiri, maka monitoring dan optimasi konfigurasi sangat disarankan.
Q: Bisa tidak menggunakan Nginx?
A: Bisa. Namun panduan ini fokus pada Apache Web Server, dan prinsip dasarnya tetap sama dengan penyesuaian konfigurasi Nginx.