Java
In the modern server ecosystem, Java remains one of the most reliable platforms for running various web and enterprise applications. One frequently used combination is Java with Apache Web Server on AlmaLinux 8, a stable RHEL-based operating system relied upon by many sysadmins. This guide will cover in-depth, systematic, and structured detail how to install Java and integrate it with Apache Web Server on AlmaLinux 8 to support various Java-based application needs.
Prerequisites
- Full
rootaccess - Apache/HTTPD installed
- Basic Linux Command Line
- Security
Java Installation
There are several Java distributions we can use, such as:
- OpenJDK (free and open-source)
- Oracle JDK (proprietary with a special license)
In this guide, we'll be using OpenJDK 17, the most stable and popular version currently available for development and production. AlmaLinux 8 typically already has the OpenJDK package in the default repositories. However, to be sure, please run the following command:
dnf search openjdk
Install OpenJDK 17:
dnf install java-17-openjdk java-17-openjdk-devel -y
Verify Java installation:
java -version
javac -version
Example output:
openjdk version "1.8.0_452"
OpenJDK Runtime Environment (build 1.8.0_452-b09)
OpenJDK 64-Bit Server VM (build 25.452-b09, mixed mode)

javac 17.0.15
If you have previously installed another version of Java, we need to make sure Java 17 is the default by:
alternatives --config java
Example output. Select Java 17 from the list provided:
There are 2 programs which provide 'java'.

  Selection    Command
-----------------------------------------------
*+ 1           java-1.8.0-openjdk.x86_64 (/usr/lib/jvm/java-1.8.0-openjdk-1.8.0.452.b09-2.el8.x86_64/jre/bin/java)
   2           java-17-openjdk.x86_64 (/usr/lib/jvm/java-17-openjdk-17.0.15.0.6-2.el8.x86_64/bin/java)

Enter to keep the current selection[+], or type selection number: 2
Then verify:
java --version
Example output:
openjdk 17.0.15 2025-04-15 LTS
OpenJDK Runtime Environment (Red_Hat-17.0.15.0.6-1) (build 17.0.15+6-LTS)
OpenJDK 64-Bit Server VM (Red_Hat-17.0.15.0.6-1) (build 17.0.15+6-LTS, mixed mode, sharing)
Setting JAVA_HOME Environment
Adding the JAVA_HOME variable is essential for running many Java-based applications.
Check the Java installation path:
readlink -f $(which java)
Example output:
/usr/lib/jvm/java-17-openjdk-17.0.15.0.6-2.el8.x86_64/bin/java
Add JAVA_HOME in the environment:
nano ~/.bash_profile
Fill in the following parameters at the very bottom:
export JAVA_HOME=/usr/lib/jvm/java-17-openjdk-17.0.15.0.6-2.el8.x86_64/bin/java
export PATH=$JAVA_HOME/bin:$PATH
Save and reload profile:
source ~/.bash_profile
Java Virtual Host in Apache
Apache Web Server is one of the most widely used HTTP servers. Make sure it's installed on your server. If it's not installed, run the following command to install it on AlmaLinux 8:
dnf install httpd -y
systemctl enable --now httpd
Make sure port 80 (and 443 if using SSL) is open on firewalld:
firewall-cmd --permanent --add-service={http,https}
firewall-cmd --reload
Install Tomcat as a Java application server and servlet container:
dnf install tomcat -y
systemctl enable --now tomcat
Then create a virtual host with reverse proxy mode pointing to tomcat
nano /etc/httpd/conf.d/focusnic.biz.id.conf
Fill in the following parameters:
<VirtualHost *:80>
    ServerAdmin webmaster@focusnic.biz.id
    ServerName focusnic.biz.id
    ServerAlias www.focusnic.biz.id

    ProxyPreserveHost On
    ProxyRequests Off
    ProxyPass / http://localhost:8080/app1/
    ProxyPassReverse / http://localhost:8080/app1/

    <Proxy *>
        Order deny,allow
        Allow from all
    </Proxy>

    ErrorLog /var/log/httpd/focusnic.biz.id-error.log
    CustomLog /var/log/httpd/focusnic.biz.id-access.log combined
</VirtualHost>
Brief description of the above parameters:
ProxyPreserveHost On→ Instructs Apache to forward the originalHost:header from the client when proxying to the backendhttp://localhost:8080/app1/ProxyRequests Off→ Ensures that Apache does not act as a general forward proxy (open proxy). We only want Apache to be a reverse proxy for Tomcat.ProxyPass→ Forwards all requests from the root URL/tohttp://localhost:8080/app1/. So, if a user accesseshttp://focusnic.biz.id/page.jsp, Apache will fetch its content fromhttp://localhost:8080/app1/page.jsp.
If using SELinux please allow http connect:
setsebool -P httpd_can_network_connect 1
chcon -Rt tomcat_var_lib_t /var/lib/tomcat/webapps/
ls -Z /var/lib/tomcat/webapps
Then restart Apache to save the above configuration:
systemctl restart httpd
Preparing Directories for Java Applications
Java applications will be processed by Tomcat, and HTTP/Apache only acts as a reverse gateway. Instead, we need to create a file in Tomcat's web root directory. The default is /var/lib/tomcat/webapps. Run the following command to create a new directory for each project/domain:
mkdir /var/lib/tomcat/webapps/app1
cd /var/lib/tomcat/webapps/app1
nano hello.jsp
Fill in the following simple script:
<%@ page language="java" %>
<%@ page import="java.util.Date" %>
<%@ page import="java.text.SimpleDateFormat" %>
<html>
<body>
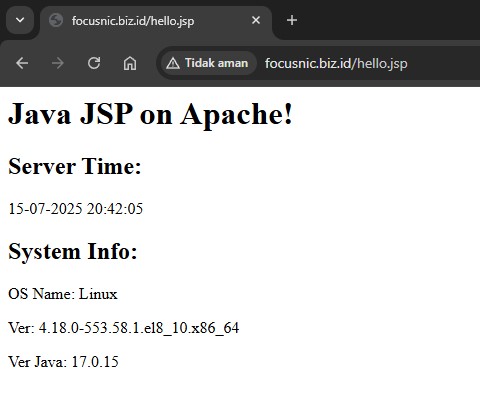
<h1>Java JSP on Apache!</h1>
<h2>Server Time:</h2>
<%
// Get current server time
SimpleDateFormat formatter = new SimpleDateFormat("dd-MM-yyyy HH:mm:ss");
String currentTime = formatter.format(new Date());
out.println("<p>" + currentTime + "</p>");
// Get Kernel
String osName = System.getProperty("os.name");
String osVersion = System.getProperty("os.version");
String javaVersion = System.getProperty("java.version");
%>
<h2>System Info: </h2>
<p>OS Name: <%= osName %></p>
<p>Ver: <%= osVersion %></p>
<p>Ver Java: <%= javaVersion %></p>
</body>
</html>
Then adjust the permissions:
chown root:tomcat hello.jsp
Then access on browser by typing http://$DOMAIN_NAME/hello.jsp
Troubleshooting
- Permission denied, Error AH00957
Here is the complete error message:
(13)Permission denied: AH00957: HTTP: attempt to connect to 127.0.0.1:8080 failed
The solution is to allow Apache (httpd) to make outbound network connections to Tomcat on port 8080 if SELinux is enabled:
setsebool -P httpd_can_network_connect 1
- 404 Not Found
The .jsp file already exists, but when accessed from a browser, a 404 Not Found error appears. Ensure the .jsp file actually exists in /var/lib/tomcat/webapps/app1/. Then, adjust the permissions to the tomcat user with the following command.
chown -R tomcat:tomcat /var/lib/tomcat/webapps/app1
- Apache Displays Default Page, Not JSP
The browser will only display the default Apache page, not your Java application. Check that the ProxyPass is correct:
ProxyPass / http://localhost:8080/app1/
ProxyPassReverse / http://localhost:8080/app1/
Access the JSP with the following URL http://focusnic.biz.id/hello.jsp
- JSP Applications Can Only Be Accessed If SELinux Setenforce to 0
When SELinux is enabled (Enforcing), Java applications cannot be accessed. When SELinux is enabled (Enforcing 0), they can be accessed. Run the following command:
restorecon -Rv /var/lib/tomcat/
Make sure the file has the SELinux label tomcat_var_lib_t:
ls -Z /var/lib/tomcat/webapps/app1/
- Tomcat Does Not Deploy Application Folder
The app1 folder exists but is inactive in Tomcat. Solution:
- Ensure the
app1folder is not empty and contains at least one.jspfile. - Ensure there are no permissions issues (must be owned by the
tomcatuser).
Conclusion
Installing Java on Apache Web Server with a reverse proxy to Tomcat on AlmaLinux 8 is an efficient and modular solution for hosting JSP/Servlet-based Java applications. This process combines the power of Apache as a reverse proxy with the performance of Tomcat as a Java container.
Important things to ensure:
- The Apache proxy module (
mod_proxy,mod_proxy_http, ormod_proxy_ajp) has been enabled. - SELinux is configured correctly to allow Apache to access the Tomcat backend.
- The Java application folder has the appropriate SELinux permissions and context.
- The
ProxyPassandProxyPassReverseconfigurations are adjusted to reflect the application's path structure.
With proper configuration, this integration enables scalable, secure, and flexible deployment for a wide range of Java web application needs.
Q: Do I still need mod_jk if I'm already using mod_proxy?
A: mod_proxy is sufficient for forwarding requests to Tomcat, either via HTTP (mod_proxy_http) or AJP (mod_proxy_ajp). You don't need a workers.properties file if you're already using mod_proxy.
Q: Can I host more than one Java application on a single Apache-Tomcat server?
A: Use a different VirtualHost for each domain, and point them to different contexts in Tomcat (/app1, /app2, etc.). For example:
ProxyPass / http://localhost:8080/app1/
Q: Why is my .jsp file still inaccessible even though it exists?
A: Check:
- Is the
.jspfile owned by thetomcatuser? - Is it located in the
webapps/app1/folder? - Did Tomcat successfully deploy the application?
- Was access done via the correct path?
Q: Do I need a web.xml file in every Java application I have?
A: If I just want to test .jsp, it's not required. However, for formal Java web applications (using servlets, filters, etc.), the WEB-INF/web.xml file is required.
Q: Is this setup safe for a production server? A: Yes, if configured correctly:
- Enable SELinux and set the boolean
httpd_can_network_connect - Use HTTPS via Let's Encrypt (can use
mod_ssl) - Harden Tomcat by restricting access to
manager,host-manager, etc.