Node.js
In the world of modern application development, Node.js has become one of the most popular technologies due to its ability to handle asynchronous processes and high performance. For those of us who use Apache Web Server on AlmaLinux 8, it is important to know how to integrate Node.js so that applications can run optimally, both for production and testing needs. This guide will discuss how to install Node.js on Apache Web Server on AlmaLinux 8 in a complete, detailed, and in-depth manner, including proxy configuration using mod_proxy, firewall settings, to deployment verification.
Prerequisites
- Full
rootaccess - Apache/HTTPD installed
- Basic Linux Command Line
- Security
- Domain (optional)
Install Node.js
Before installing Node.js, make sure your AlmaLinux 8 system is up to date and ready to accept new packages. Please update and add the epel repository:
EPEL (Extra Packages for Enterprise Linux) is essential to ensure all required additional dependencies are accessible.
dnf update -y
dnf install epel-release -y
To get the latest stable version of Node.js 22 and NPM, we will use the official repository from NodeSource:
curl -fsSL https://rpm.nodesource.com/setup_22.x | sudo bash -
dnf install nodejs -y
Verify:
node -v
npmv -v
Example output:
v22.17.1

10.9.2
Apache Virtualhost for Node.js
Because the Apache Web Server cannot directly run Node.js applications, we need to configure mod_proxy to forward requests from port 80 to the Node.js application on port 3000, which Apache calls a Reverse Proxy for Node.js. If you don't have Apache installed, please install it using the following command:
dnf install httpd -y
systemctl enable --now httpd
Then install the required proxy module:
dnf install mod_proxy_html
Allow ports 80 and 443 on firewalld:
firewall-cmd --permanent --add-service={http,https}
firewall-cmd --reload
If you want to access your Node.js application directly on port 3000 (for development purposes), open that port as well:
firewall-cmd --add-port=3000/tcp --permanent
firewall-cmd --reload
Create a virtual host:
nano /etc/httpd/conf.d/focusnic.biz.id.conf
Fill in the following parameters:
<VirtualHost *:80>
    ServerAdmin webmaster@focusnic.biz.id
    ServerName focusnic.biz.id
    ServerAlias www.focusnic.biz.id

    ProxyPreserveHost On
    ProxyRequests Off
    ProxyPass / http://localhost:3000/
    ProxyPassReverse / http://localhost:3000/

    ErrorLog /var/log/httpd/focusnic.biz.id-error.log
    CustomLog /var/log/httpd/focusnic.biz.id-access.log combined
</VirtualHost>
Restart Apache to save changes:
apachectl configtest
systemctl restart httpd
Then, create a standard directory commonly used when using virtual hosts, although NodeJS applications can actually be run anywhere. This is especially important when managing more than one NodeJS project and for easier management:
mkdir -p /var/www/focusnic.biz.id/app1
Then create a hello.js file to display a simple program:
nano /var/www/focusnic.biz.id/app1/hello.js
Fill in the following script:
const http = require('http');
const os = require('os');
const exec = require('child_process').exec;

const port = 3000;

const requestHandler = (req, res) => {
  exec('npm -v', (err, npmVersion) => {
    if (err) npmVersion = 'Unable to fetch NPM version';

    const html = `
      <html>
        <head>
          <title>Info Server Node.js</title>
          <style>
            body {
              font-family: Arial, sans-serif;
              margin: 40px;
              background-color: #f8f9fa;
            }
            .card {
              background: #fff;
              padding: 20px;
              max-width: 600px;
              margin: auto;
              box-shadow: 0 2px 8px rgba(0,0,0,0.1);
              border-radius: 8px;
            }
            h2 { color: #343a40; }
            p { font-size: 1.1em; }
          </style>
        </head>
        <body>
          <div class="card">
            <h2>Server Information</h2>
            <p><strong>Server Time </strong> ${new Date().toLocaleString()}</p>
            <p><strong>OS:</strong> ${os.type()} ${os.release()} (${os.platform()})</p>
            <p><strong>Node.js ver:</strong> ${process.version}</p>
            <p><strong>NPM ver:</strong> ${npmVersion.trim()}</p>
          </div>
        </body>
      </html>
    `;
    res.writeHead(200, { 'Content-Type': 'text/html' });
    res.end(html);
  });
};

const server = http.createServer(requestHandler);
server.listen(port, () => {
  console.log(`App running on http://localhost:${port}`);
});
Then run the app:
cd /var/www/focusnic.biz.id/app1/
node hello.js
Here is an example of output on the terminal:
To exit or stop the program, press CTRL+C and then check with the command ss -tulpn | grep 3000. If it still exists, kill the PID with the command kill -9 $PID.
App running on http://localhost:3000
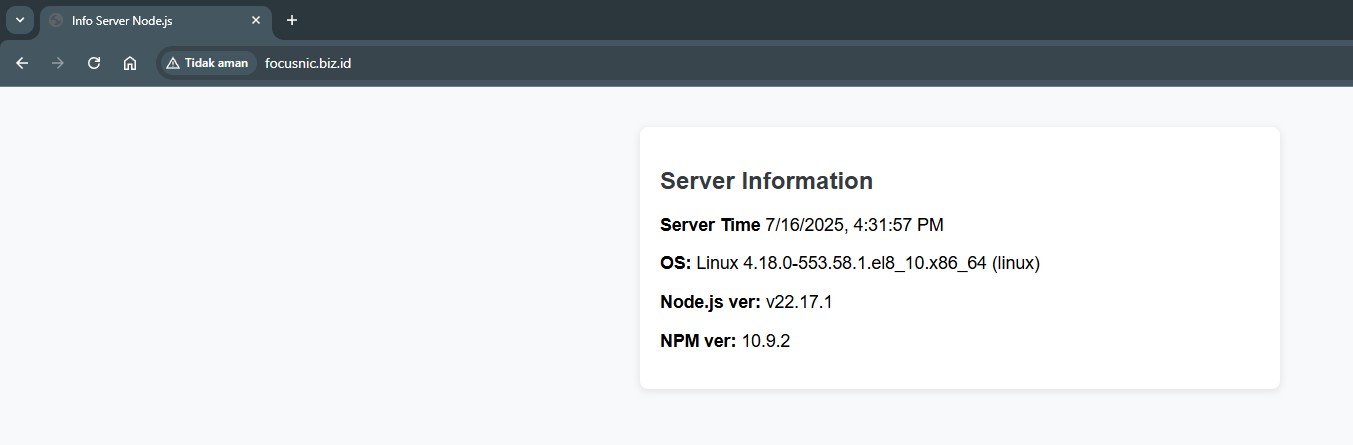
The following is an example of the output when accessed via a browser http://$NAMA_DOMAIN
PM2
To ensure that the Node.js application continues to run even after the system is restarted, we can use PM2, the Node.js Process Manager:
Install PM2 globally:
npm install -g pm2
pm2 start hello.js --name helloapp
Here is an example of the output:
[PM2] Spawning PM2 daemon with pm2_home=/root/.pm2
[PM2] PM2 Successfully daemonized
[PM2] Starting /var/www/focusnic.biz.id/app1/hello.js in fork_mode (1 instance)
[PM2] Done.
┌────┬─────────────┬─────────────┬─────────┬─────────┬──────────┬────────┬──────┬───────────┬──────────┬──────────┬──────────┬──────────┐
│ id │ name        │ namespace   │ version │ mode    │ pid      │ uptime │ ↺    │ status    │ cpu      │ mem      │ user     │ watching │
├────┼─────────────┼─────────────┼─────────┼─────────┼──────────┼────────┼──────┼───────────┼──────────┼──────────┼──────────┼──────────┤
│ 0  │ helloapp    │ default     │ N/A     │ fork    │ 173670   │ 0s     │ 0    │ online    │ 0%       │ 42.1mb   │ root     │ disabled │
└────┴─────────────┴─────────────┴─────────┴─────────┴──────────┴────────┴──────┴───────────┴──────────┴──────────┴──────────┴──────────┘
Save processes to run at boot:
pm2 startup systemd
pm2 save
Use --watch to autoreload when files change (development only):
pm2 start app.js --watch
Use --env to set the environment:
pm2 start app.js --env production
PM2: Basic Operations
| No | Command | Function | Example |
|---|---|---|---|
| 1 | pm2 start <file> --name <nama> | Run the Node.js app and name the process | pm2 start app.js --name myapp |
| 2 | pm2 list | View all processes executed by PM2 | pm2 list |
| 3 | pm2 show <nama> | View details of a single process | pm2 show myapp |
| 4 | pm2 stop <nama> | Stop the app | pm2 stop myapp |
| 5 | pm2 restart <nama> | Restart the app | pm2 restart myapp |
| 6 | pm2 delete <nama> | Removing an app from the PM2 process list | pm2 delete myapp |
| 7 | pm2 logs [nama] | View app output logs | pm2 logs myapp |
PM2: Advanced Operations
| No | Command | Function | Example |
|---|---|---|---|
| 1 | pm2 startup | Make PM2 run automatically at boot | pm2 startup |
| 2 | pm2 save | Saves the current process to be reloaded after a reboot | pm2 save |
| 3 | pm2 reload <nama> | Reload app without downtime (hot reload) | pm2 reload myapp |
| 4 | pm2 start app.js -i max | Running app in cluster mode (multi-core) | pm2 start app.js -i max --name cluster-app |
| 5 | pm2 monit | Real-time monitoring of app processes | pm2 monit |
| 6 | pm2 ecosystem | Creating a configuration file template ecosystem.config.js | pm2 ecosystem |
| 7 | pm2 start ecosystem.config.js | Running an app from a configuration file | pm2 start ecosystem.config.js |
| 8 | pm2 deploy ecosystem.config.js <env> [command] | Automatic deployment via SSH (requires configuration ecosystem.config.js) | pm2 deploy ecosystem.config.js production setup |
| 9 | pm2 resurrect | Restore previously saved processes (after reboot or crash) |
NVM (Node Version Manager) (opsional)
Using NVM, we can manage multiple NodeJS versions. For example, versions 18, 20, 22, and so on. These are typically installed per user within a single environment or server, thus separating the production and development versions of NodeJS.
Execute the following command to install NVM:
curl -o- https://raw.githubusercontent.com/nvm-sh/nvm/v0.40.3/install.sh | bash
source ~/.bashrc
Then list the Node.js version with the following command:
nvm list-remote
Then install the latest version of Node.js 22:
nvm install 22
Then set the default Node.js version:
nvm use 22
Troubleshooting
- node: command not found
Check with the command which node or echo $PATH. If using NVM, make sure nvm.sh is executed in .bashrc
- Node.js version is not compatible
Use NodeSource for the latest version: curl -fsSL https://rpm.nodesource.com/setup_22.x
- npm: command not found
Use node -v to check the version. If the version is too old, uninstall and reinstall Node.js from NodeSource.
- nvm: command not found
Add to ~/.bashrc or ~/.bash_profile: export NVM_DIR="$HOME/.nvm and source ~/.nvm/nvm.sh
- Can't use Node.js with sudo
Avoid sudo when using NVM. If you need root access, install Node.js system-wide (via NodeSource)
- PM2 does not recognize the node on reboot
Use the Node.js version of NodeSource for production use or set $PATH manually in systemd
Conclusion
Node.js and NPM are the foundation for running server-side JavaScript applications. In AlmaLinux 8, the best installation for production is NodeSource, and NVM is only recommended in development environments due to its flexibility in switching Node.js versions. Use PM2 for Node.js process management.
Q: Do I need to install both Node.js and NVM?
A: No. Use one of these:
- Node.js from NodeSource → for production
- NVM → for developers who need multiple versions of Node.js
Q: How do I uninstall a Node.js version if it's already installed?
A:
- If installed from dnf or NodeSource:
dnf remove nodejs - If using NVM:
nvm uninstall $VER_NODEJS
Q: How do I change the Node.js version with NVM?
A: Run the following command, for example, if you want to use `node v20
nvm install 20
nvm use 20
Q: Why isn't Node.js recognized after a reboot when using PM2?
A: Because NVM isn't global and isn't recognized by systemd. Solution:
- Don't use NVM in production
- Use Node.js from NodeSource
- Or explicitly set the PATH in the
systemdunit file
Q: Do I need to run Node.js applications as root?
A: Not recommended. Run as a regular user. Root is only used for installation and system configuration.